
CNC cutting tools are nothing new. Humans have been creating and refining tools from the first stone axes to the most cutting-edge end mills since the beginning of time. In this article, we’ll be covering the top 8 milling tools that form the backbone of every professional machining job. Before you even start thinking about feeds and speeds, you need to get a handle on these fundamentals. Of course, we can’t cover everything in one short blog, so take this as some foundational knowledge to build upon when you encounter different or specialty tools.
CNC Milling Tool Materials
Before jumping into each tool, let’s focus on what they have in common – tool material and fundamental operation. The most common materials you’ll encounter in CNC milling tools include:
Carbon Steel
This is the most inexpensive material of the bunch and includes a total of 0.6-1.5% of carbon with small amounts of manganese and silicon. You’ll typically find this material used for low-speed operations in twist drills, forming tools, milling cutters, and turning.
High-Speed Steel (HSS)
This material combines chromium, tungsten, and molybdenum to give HSS improved hardness, toughness, and wear resistance over carbon steel. HSS tools are generally more expensive than others, but they’re built to last and provide a high material removal rate for both ferrous and nonferrous materials.
Solid Carbide
This material is more resistant to wear than HSS and prone to chipping instead of wearing out evenly over time. Because of this you’ll find solid carbide used mainly in finishing applications in newer milling machines or those with less spindle wear. Typically carbide tools are made by sintering carbide with another metal, like tungsten, titanium, or tantalum, giving these tools high heat resistance and making them ideal for high-quality surface finishes.
Ceramics
Ceramics are corrosion-resistant and made from aluminum oxide and silicon nitride. Their heat and wear resistance means they can function in high heat cutting environments where other tools would not. These tools are typically ideal for cast iron, hard steels, and superalloys.
CNC Milling and Cutting Tool Fundamentals
Whether you have an HSS or carbon steel end mill, all of your tools will work the same. The principles of rotation direction, chip formation, chip load, and milling orientation will travel with you throughout your machinist career.
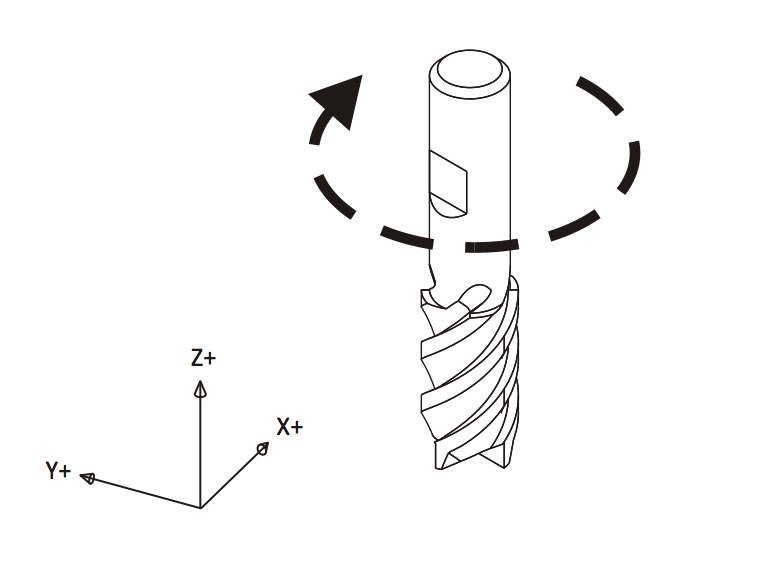
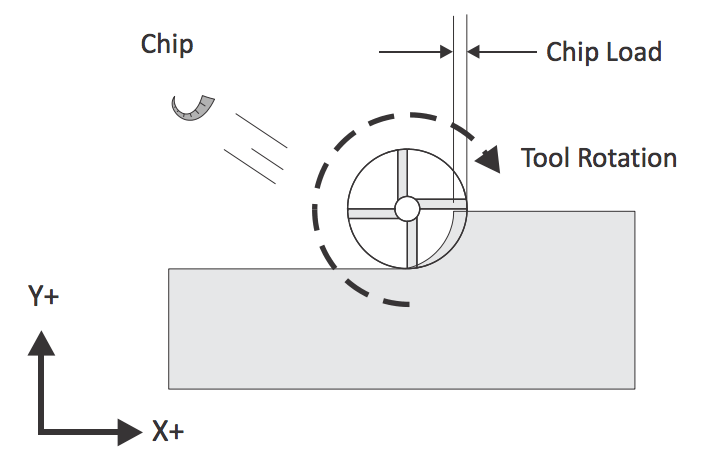
Rotation Direction
Every tool – except those designated as left-hand, like a left-handed tap – will rotate in a clockwise direction when viewed looking down at the part from the machine’s spindle.
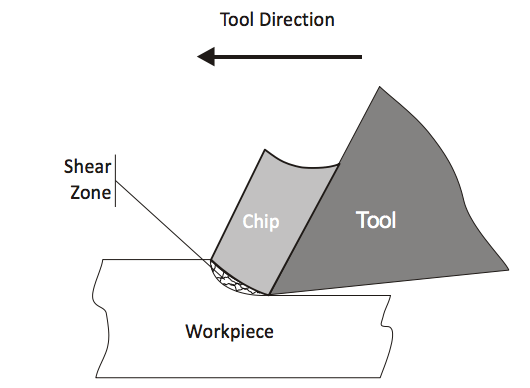
Chip Formation
Cutting tools will remove metal from a block of material via a process call shearing. This will eject metal up through a tool’s flutes as it moves through a material.
Chip Load
The thickness of the material ejected from a tool is called the chip load. Many CAM applications show the calculated chip load based on the selected tool parameters, spindle speed, and linear feed rate. They can also program feeds and speeds based on the desired chip load as an input. Observing the size, shape, and color of chips can help an experienced machinist adjust cutting speeds on the fly.
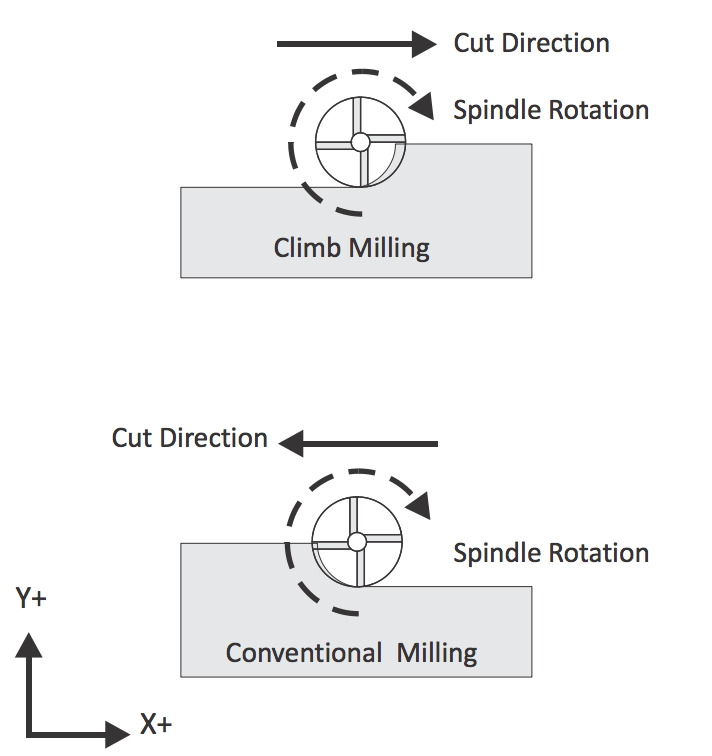
Climb & Conventional Milling
Conventional milling is traditionally used on manual machines, where keeping backlash to a minimum is important. In this cutting direction, the tool cuts from a small amount of material up to a larger thickness, rubbing against the material through the cut.
CNC machines, which have higher rigidity and are significantly less prone to backlash, will use a Climb Milling process where the tool advances through material from maximum to minimum thickness. This cutting process allows the heat to leave the cut with the chip, reducing heat generation and tool wear while producing a better surface finish than conventional milling.
The Top 8 CNC Tools
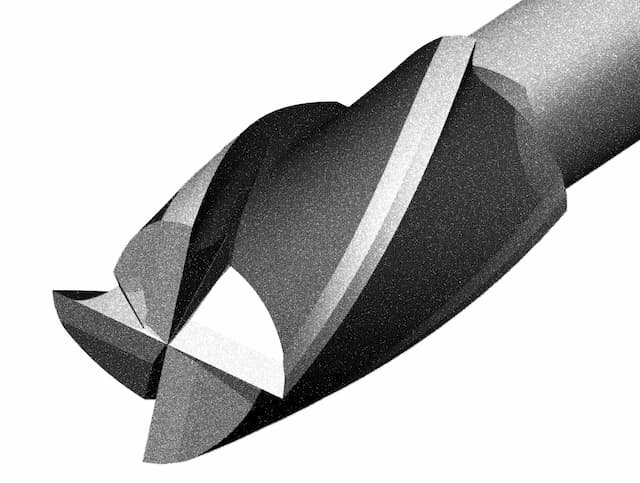
#1 – End Mills
Need to start shearing away loads of material? End mills are your answer. While endmills can take many forms, they typically have sharp cutting flutes on the ends and sides and can be used in various cutting applications:
| Side Milling Used for machining an edge surface on a part. |

Face Milling
Use for machining the top face on a part.
Slot Milling
Used for machining between two edge surfaces.
Plunge Milling
Used for machining along the Z-axis, requires a center cutting end mill.
Ramping
Use for simultaneously machining in the radial and axial direction, resulting in an angular toolpath. Ramping toolpaths can be circular or linear.
Image courtesy of Harvey Performance Company.
Every end mill shares the same basic anatomy. The overall length of the tool can be cut into two sections, the shank and cut length. The shank is gripped in the tool holder, and the cut length includes features like flutes and cutting-edge teeth.
Image courtesy of Makezine.
Coatings on end mills increase hardness, enhance tool longevity, and allow for faster cutting speeds. The most popular coatings include:
- Titanium Nitride (TiN). The standard finish is used on alloy steel, aluminum, and plastic.
- Titanium Carbonitride (TiCN). Provides a better wear resistance than TiN.
- Super-life Titanium Nitride (Al-TiN). The best coating for high feed/speed and high-temperature applications.
Center vs. Non-Center Cutting
End mills are either center cutting or non-center cutting. This is basically the tool’s ability to cut straight down into a material without requiring a pre-drilled hole. A center-cutting end mill has cutting edges that extend into the center of the tool, which allows it to plunge into a material. A non-center cutting end mill only has cutting edges on the side and requires either a pilot hole, ramping, or helical motion to plunge straight down.
Flutes
Every end mill includes several cutting edges that are machined into the side of the tool. These provide an easy path for ejected chips to travel along as your tool shears away at a block of material.
There are flute configurations from a single flute up to 8 or more flutes. Which one is the best? That depends on the material you want to cut and what your machine can handle. For example, cutting something like aluminum will produce large chips. Using a cutter with too many flutes will likely keep the chips from clearing effectively, causing the tool to clog and heat to build in the tool.
Here’s a good rule of thumb – the harder the material, the more flutes you’ll want to use. This will reduce chip load and improve surface finish. Keep these considerations in mind when choosing between the most common flutes – two, three, and four:
- Two Flute. This configuration provides the most space for chip ejection and is ideal for cutting softer materials like aluminum.
- Three Flute. This configuration can handle both ferrous and non-ferrous materials and provides a better part finish and overall strength.
- Four Flute. The extra flute in this configuration provides faster feeds rates and higher-quality finishes than two or three flute setups. However, you also run the risk of reduced chip removal space and jamming.
Types of End Mills
| Ball Nose The end of this endmill is ball-shaped, making it ideal for 3D contour work. Their rounded ends make high quality curved surfaces. |
This tool has a rounded corner but a flat bottom and can create a fillet on the bottom of a wall. The corner radius is less prone to breakage than the sharp corners on flat end mills, so bull nose end mills are often used for roughing.
These end mills come to a sharp point and are typically used to chamfer or break sharp edges on parts. They typically come in 90 and 60 degrees, and the tip can be sharp or ground flat. Flat
These are general-purpose end mills typically used for milling prismatic 2D features.
The serrations in a roughing tip can quickly remove large amounts of material while leaving a rough finish.
You’ll use this tool to make a flat area on a block of material. This is typically done on the top of the stock to flatten it before other milling tools are used. A face mill contains one solid body with multiple cutter inserts that can be swapped as needed. The more cutters, the faster metal can be removed.
Image courtesy of MSC Direct.
#3 – Fly Cutters
Need to produce an amazing surface finish? Fly cutters can make it happen. These cutting tools move along the surface of a material in a clockwise rotation, producing an ultra-clean shine.
Image courtesy of Sherline.
#4 – Twist Drills
Drill bits have a conical cutting point with a shaft with one or more flutes, similar to an end mill. The most common twist drills are made out of High-Speed Steel (HSS) or solid carbide. Gold-colored coatings such as TiN are typically used to increase the drill’s hardness, reduce wear, and increase tool life.
Image courtesy of RS Components.
#5 – Center Spotting Drills
These stubby tools are used to create an accurate conic hole before drilling, which helps prevent drill bits from “walking” during operation or drilling the hole at an inaccurate location. There are also combined spotting-countersink drills that can create a screw clearance hole and countersink in one operation.
Image courtesy of Unicorn Tool.
A drawing of the drill bit entering the cone-shaped guide hole made with a center drill—image courtesy of American Machine Tools.
#6 – Taps and Thread Mills
Taps are used to cut internal threads in a material. However, not all threads are made with a cutting process. Roll Form taps are forced into a hole, and the material is then formed around the tap. This works great for softer materials like aluminum, copper, brass, and plastics. Thread mills are similar, but can cut either internal or external threads.
Image courtesy of Pixabay
#7 – Reamers
Reamers can expand existing holes to a specific tolerance while also adding a nice surface finish. You’ll use these to ensure a hole has an accurate roundness and diameter. Reamers require a pre-drilled hole that’s close enough in size, so it only has to remove a small amount of material.
Image courtesy of Carbide and Diamond Tooling.
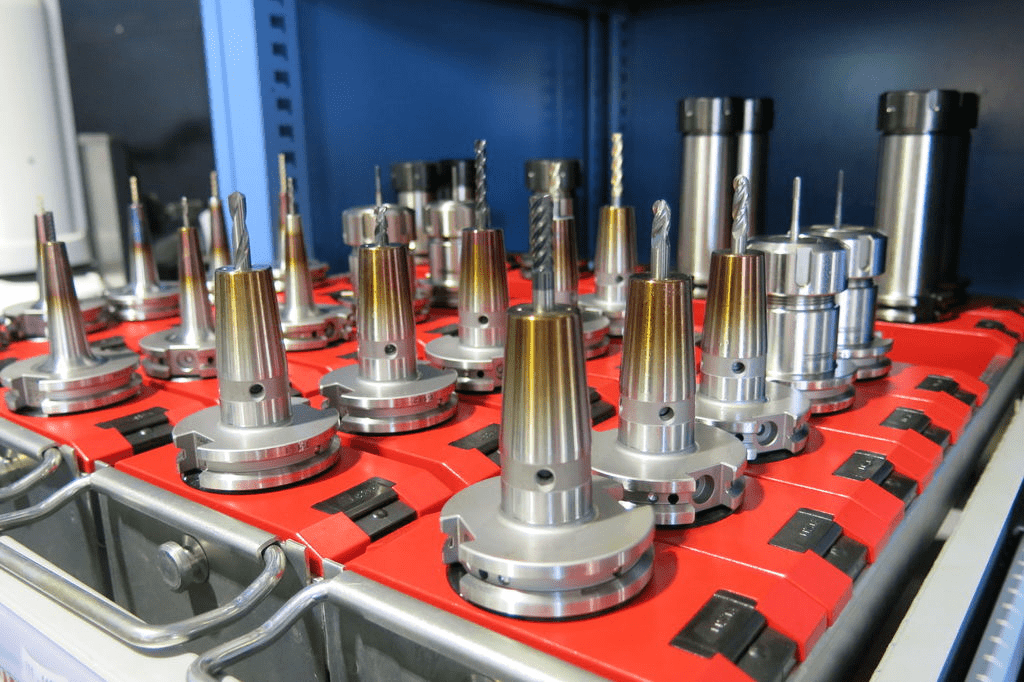
#8 – Tool Holders
| Solid End Mill Holders End mills with a Weldon flat are secured by a set screw, which provides a strong grip and minimal concentricity loss. |
ER Collet Holder
ER collets can hold many different sizes and types of tools. While they are known for their versatility, they are less secure than hydraulic, shrink fit, and end mill holders.
Image courtesy of Micro Machine Shop.
Collet Chucks
These have better gripping power than collet chucks and are more rigid and accurate. You’ll find them used in high-speed applications with larger tools.
Image courtesy of Glacier.
Drill Chucks
Drill chucks provide a convenient holder for general hole drilling jobs that makes switching between drill bits simple. You can also use a collet chuck as a replacement for drill chucks. Image courtesy of Amazon.
These specialty holders use either fluid or thermal expansion to center and compress a tool. Both provide excellent tool concentricity.
Pick the Right Tool for the Job
Choosing the right CNC tool for the job will set you up for machining success. While there are many other tools that you’ll encounter during your machining career, this list will serve as a foundation to build upon. Familiarize yourself with how each one works, make sure to find out which tools are important to your specific shop’s applications, and in time you’ll know how to handle any job that comes your way.
